It all started with the fact that I decided to have my own DMR Hot Spot, frequent trips and lack of coverage for DMR converters are the main reasons why I bought the MMDVM duplex plate.
Another reason for building a solar hot spot was that I bought the board itself without the housing. When I started to choose the housing, I dreamed to have at least two 18650 batteries inside so that I would not have to remember about the power bank. Studying a lot of articles on the internet about powering the raspberry pi zero through a 18650 battery, I came across many solutions including recharging the battery using a photovoltaic panel and decided to try to build just such a hot spot so that you can work on battery power for at least 2 days by the way, be able to recharge it without using a wall charger.
By the way, I came across numerous projects regarding the use of NEXTION screens for five star, after checking the dimensions of such a screen without waiting long ordered.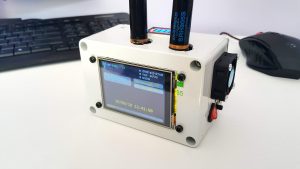
For the project I used a voltage stabilizer so that the raspberry pi was powered evenly 5V, unfortunately the 18650 battery alone gives less than 5v, the tests showed that this solution could also work but that the DC / DC converter was very cheap I also bought it.
After connecting everything, I also added a fan, but now I think it is unnecessary, quite large holes for the antennas allow you to keep the temperature below 50 ° C. additionally, I added the main power switch and the Nextion screen off switch if you need to save battery.
After putting everything together, it occurred to me that I could not check the level of battery discharge, so at the end I also added an LED indicator to control energy consumption.
The whole despite the performance in the evenings and from the jump came out quite neat and most importantly it works very well both on trips, in the car or in the field, even setting the hotspot dmr against the sun for charging did not significantly increase the temperature of its work.
Of course, using the TP4056 charger I also have the option of charging the 18650 via a wall charger.